
Introduction
Identifying the second mesiobuccal canal (MB2) is one of the major challenges in endodontic treatment of maxillary molars. Because of its small diameter, calcification, obstruction by dentinal shelves, and the complex anatomy of the mesiobuccal root, this canal may remain undetected during initial examination.
Missed canals may harbor residual pulp tissue and microorganisms within the root canal system, potentially contributing to persistent apical periodontitis or endodontic treatment failure. Therefore, a thorough understanding of pulp chamber floor anatomy, proper access cavity design, and the appropriate use of magnification and endodontic instruments is essential for locating this canal.
This article provides a step-by-step clinical overview of MB2 identification, including its anatomical location, diagnostic clues, recommended instruments, irrigation considerations, and the role of advanced imaging.
1. Understanding the Anatomy and Likely Location of the MB2 Canal
The first step in locating MB2 is understanding the anatomy of maxillary molars. The mesiobuccal root of the maxillary first molar frequently contains two canals. However, canal configuration, number, and interconnections vary among teeth.
How common is the MB2 canal?
The reported prevalence of MB2 depends on the tooth type, population studied, and diagnostic method. One cone-beam computed tomography (CBCT)-based meta-analysis reported a prevalence of approximately 69.6% in maxillary first molars and 39% in maxillary second molars. A separate meta-analysis involving an Iranian population estimated the prevalence at approximately 60% and 33%, respectively.
These variations demonstrate that no single prevalence value can be generalized to every population or clinical situation.
Clinical note: A systematic search for MB2 should be part of the routine anatomical assessment of maxillary first molars. However, the presence of the canal should not be considered confirmed without appropriate clinical or imaging evidence.
Where is MB2 usually located?
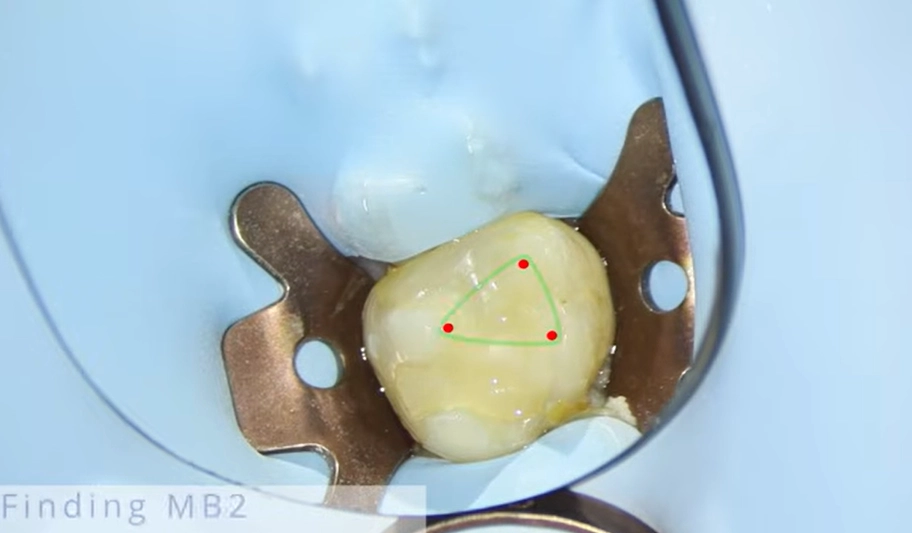
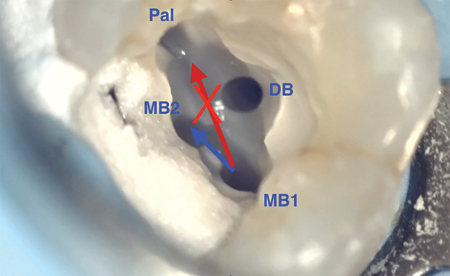
The MB2 orifice is commonly located along the developmental groove between the mesiobuccal canal (MB1) and the palatal canal. It is generally positioned palatal to MB1 and may be located slightly mesial to it, although its exact position varies.
Some studies have reported mean distances of approximately 1.7–2.7 mm between MB1 and MB2 in the palatal direction. These measurements depend on the anatomical configuration and measurement method and should not be treated as fixed coordinates for dentin removal.
A practical anatomical guideline is to imagine a line connecting MB1 and the palatal canal. MB2 is often located along this developmental pathway or slightly mesial to it. This guideline is only an anatomical reference and should not replace direct examination of the pulp chamber floor.
2. Proper Access Cavity Design
An appropriately designed access cavity provides adequate visibility of the pulp chamber floor and permits controlled access to the canal orifices.
Modifying the access cavity shape
The initial triangular access cavity of a maxillary first molar may need to be modified toward a trapezoidal or rhomboid configuration to improve visibility of the mesiopalatal region. The extent of modification should depend on the tooth's anatomy, the location of the canal orifices, and the need to preserve sound tooth structure.
Removing the chamber roof and dentinal shelves
Before searching for MB2, the following should be assessed:
-
Complete removal of the pulp chamber roof to ensure adequate visualization of the chamber floor.
-
Identification and conservative removal of dentinal shelves that may obscure the MB2 orifice.
-
Careful examination of the developmental groove between MB1 and the palatal canal.
-
Modification of access cavity walls only to the extent necessary to provide safe visibility and instrument access.
Residual dentin covering the orifice may make canal identification difficult. Conversely, excessive dentin removal can increase the risk of perforation and weaken the remaining tooth structure.
Controlled troughing
If MB2 cannot be identified during the initial examination, the developmental groove between MB1 and the palatal canal can be explored gradually using fine endodontic ultrasonic tips under magnification.
The direction of troughing should be guided by the suspected location of MB2 and the anatomy of the chamber floor. Blind cutting toward the mesial aspect or deepening the groove without identifiable anatomical clues is not recommended.
Important note: No single troughing depth can be considered safe for every tooth. Chamber floor anatomy, the degree of calcification, and dentin thickness vary. Each step should therefore be followed by reassessment of the anatomy and direction of progress.
3. Magnification and Illumination
The small diameter of the MB2 orifice and its similarity in color to the surrounding dentin can make identification difficult under direct vision.
Dental operating microscope and loupes
A dental operating microscope provides magnification and focused illumination, making it easier to identify subtle grooves, small canal orifices, and dentinal shelves. When a microscope is unavailable, magnifying loupes combined with a suitable headlight can improve visibility.
The reported success of MB2 detection varies according to the population studied, operator experience, magnification system, and use of adjunctive instruments. Therefore, detection rates reported in individual studies should not be interpreted as guaranteed clinical outcomes.
Changing the viewing angle
When the orifice is not clearly visible, modest changes in viewing angle, illumination, and operator position may help reveal subtle anatomical features. These adjustments should complement systematic anatomical examination rather than replace it.
4. Clinical Clues on the Pulp Chamber Floor
In addition to anatomical landmarks, several clinical findings may help guide the search for MB2.
A dark line between MB1 and the palatal canal
A dark line or groove between MB1 and the palatal canal may indicate the developmental pathway leading toward MB2. However, not every dark groove represents a separate canal. The area should be carefully assessed with an endodontic explorer and under appropriate magnification.
Small bubbles during sodium hypochlorite irrigation
In some cases, residual tissue beneath a dentinal shelf may produce small bubbles when sodium hypochlorite (NaOCl) contacts organic tissue. This may provide an additional clue, but it does not confirm the presence of MB2 on its own.
Use of a staining agent
In selected cases, controlled application of methylene blue to the chamber floor may improve the visibility of developmental lines and grooves. Staining should be used carefully, as residual dye may interfere with subsequent visual assessment or obscure relevant anatomical details.
Evaluating the initial canal path and curvature
MB2 may be narrow, calcified, or sharply curved in its coronal portion. Therefore, failure to observe a straight path from the orifice does not necessarily indicate that the canal is absent.
Once a suspected orifice is identified, the pathway should be explored gently with a fine hand file. Force should not be applied to negotiate an uncertain path.
5. Instruments and Techniques for Locating MB2
Instrument selection should be based on the condition of the chamber floor, the degree of calcification, and the available access.
| Instrument | Clinical application |
|---|---|
| DG16 endodontic explorer | Examining developmental grooves and locating suspected canal orifices |
| Fine hand files, sizes 6 or 8 | Initial exploration of narrow or calcified pathways |
| Pre-curved hand files | Carefully exploring possible changes in direction in the coronal portion of the canal |
| Fine endodontic ultrasonic tips | Selective removal of dentin covering the orifice and controlled troughing |
| Operating microscope or magnifying loupes with illumination | Improving visualization and guiding precise instrumentation |
A practical exploration sequence
-
Examine the chamber floor and developmental groove using a DG16 explorer.
-
If a suspicious opening is identified, gently explore it with a fine hand file, using a slightly pre-curved tip when appropriate.
-
If the orifice is covered by dentin or calcified, limited dentin removal under magnification may help expose the opening.
-
If resistance is encountered, avoid forcing the file forward. Resistance may result from curvature, calcification, or an incorrect pathway.
-
Re-examine the chamber floor after each stage of dentin removal to confirm that progress remains consistent with the anatomical pathway.
Clinical note: The goal is to locate and negotiate the actual canal safely, not to create an artificial pathway through excessive dentin removal.
6. The Role of Irrigants and Drying in Canal Identification
Endodontic irrigants are essential for root canal disinfection and cleaning. However, their role should be distinguished from the mechanical and visual procedures used to locate the MB2 orifice.
Sodium hypochlorite (NaOCl)
Sodium hypochlorite is a primary endodontic irrigant because of its antimicrobial activity and ability to dissolve organic tissue. Its concentration and method of use should be selected according to the clinical situation, treatment protocol, and safety considerations.
Ethylenediaminetetraacetic acid (EDTA)
EDTA is a chelating agent commonly used in endodontics to remove the inorganic component of the smear layer. It may help manage certain superficial mineralized deposits, but it does not replace careful troughing and controlled mechanical exploration when locating a canal orifice.
NaOCl and EDTA should be used according to an appropriate irrigation protocol. Direct simultaneous contact can reduce the available chlorine content of sodium hypochlorite.
Drying the chamber
For better visualization of the chamber floor, appropriate suction and sterile cotton pellets may be used. Drying with alcohol is not an essential step in MB2 identification and should not be considered a routine requirement for locating the canal.
During irrigation, care must also be taken to prevent uncontrolled extrusion of the solution beyond the canal and unintended contact with surrounding tissues.
7. Radiography and CBCT
When MB2 remains undetected despite clinical examination and magnification, imaging may provide valuable additional information.
Angled periapical radiographs
Periapical radiographs taken at different horizontal angulations may help assess root anatomy and the possible course of canals, particularly when anatomical structures overlap. However, two-dimensional radiographs cannot always reveal the true number of root canals.
Cone-beam computed tomography (CBCT)
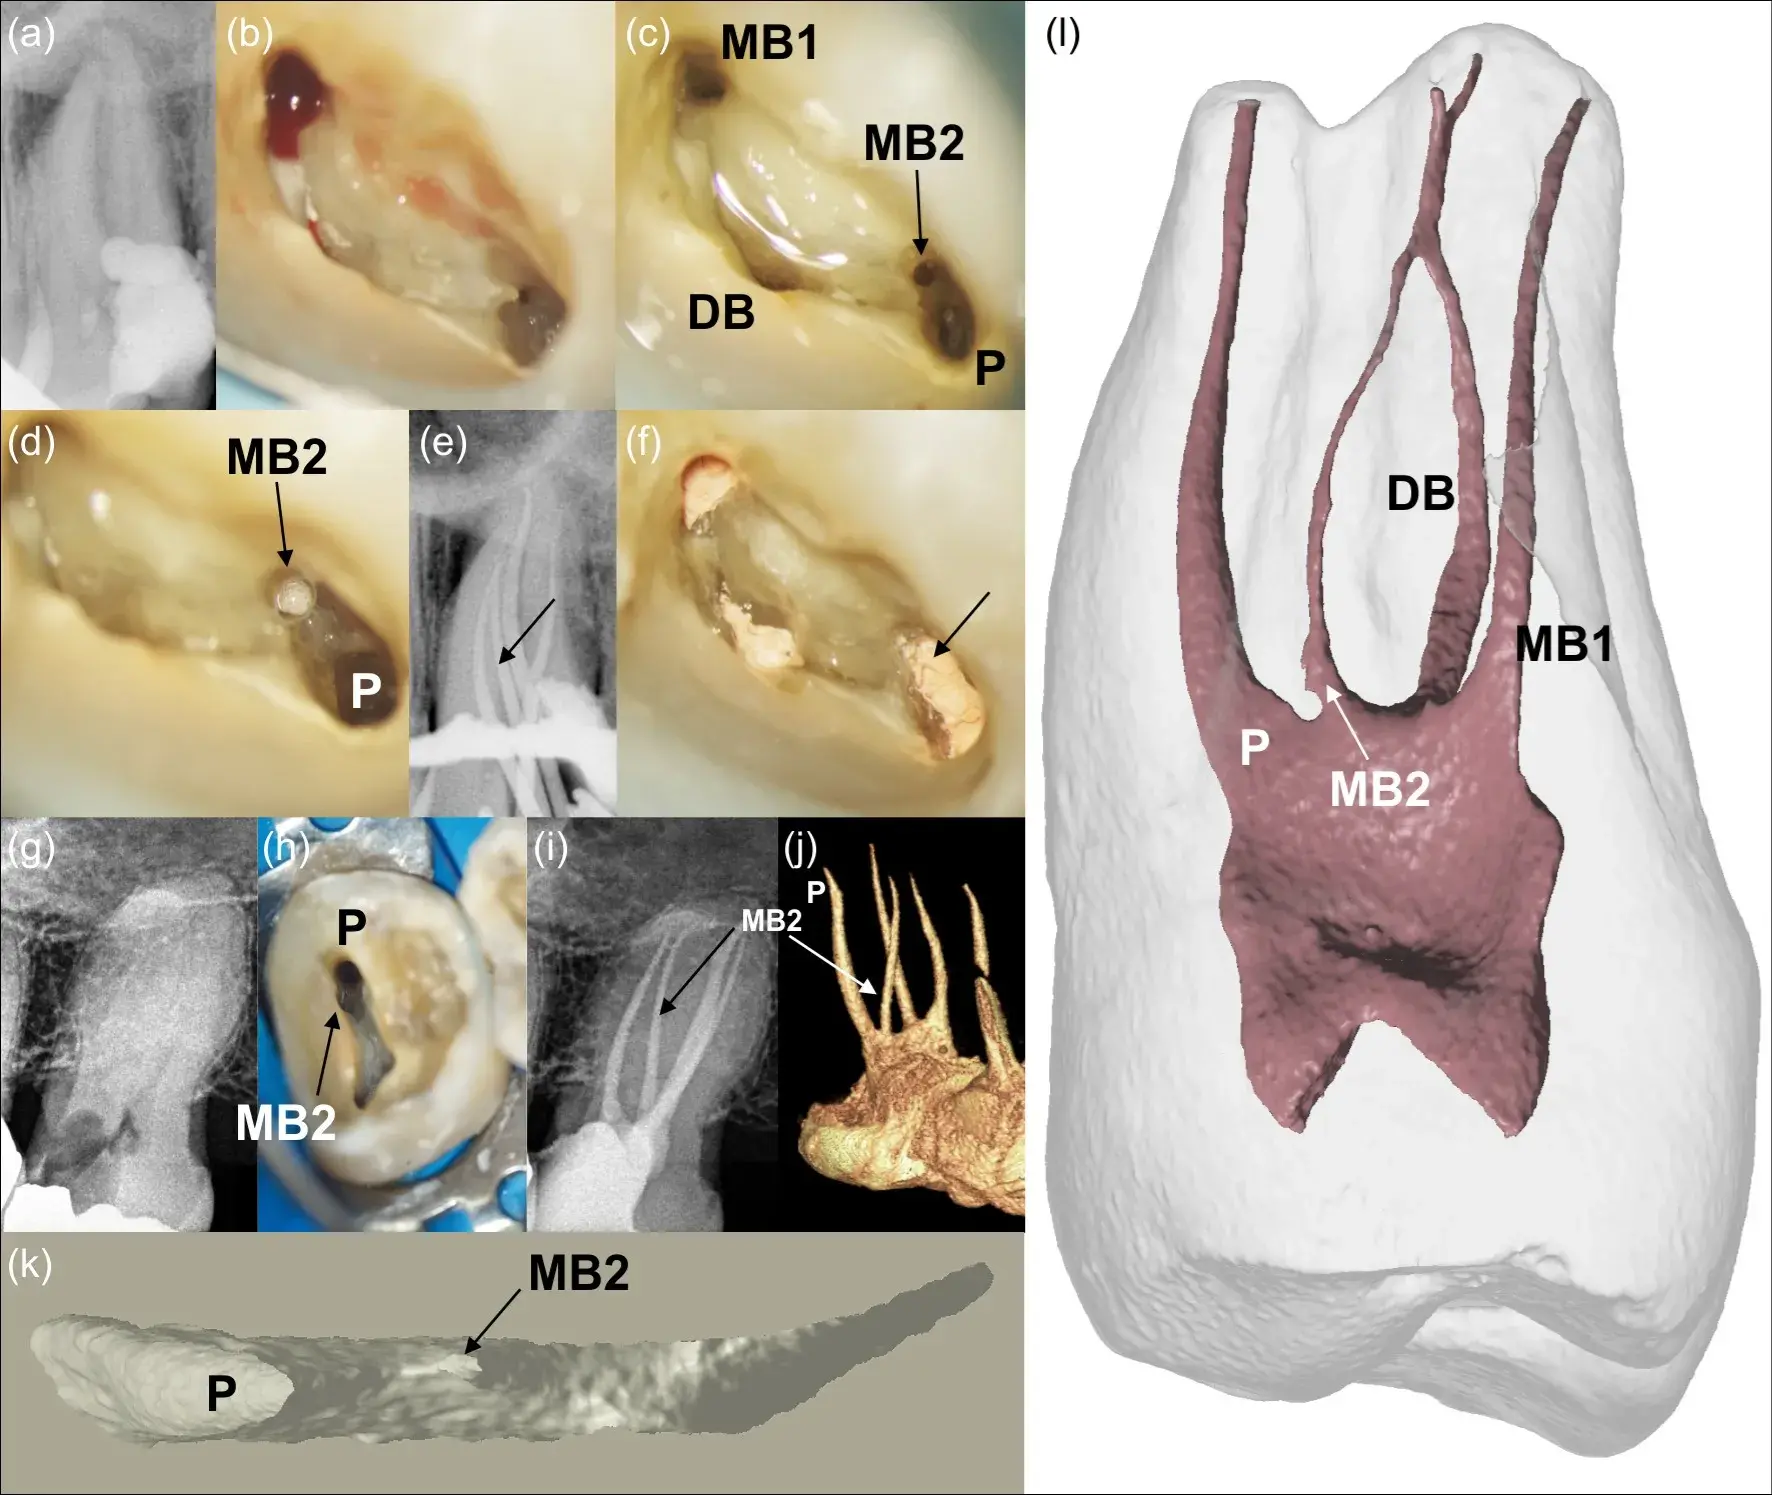
CBCT can provide three-dimensional information about the number and location of canals and the presence of calcification in selected cases.
The 2025 joint position statement from the American Association of Endodontists (AAE) and the American Academy of Oral and Maxillofacial Radiology (AAOMR) recognizes the role of limited-field-of-view CBCT in selected clinical situations, including the assessment and localization of calcified canals and the management of certain endodontic complications.
CBCT should be considered after appropriate clinical and conventional radiographic assessment, when the additional three-dimensional information is expected to influence diagnosis or treatment planning and when the expected diagnostic benefit justifies radiation exposure.
Important note: CBCT should not be requested routinely for every maxillary first molar undergoing root canal treatment. Its value is greatest when three-dimensional imaging can help resolve a specific diagnostic or treatment-related problem.
8. What to Consider After Locating MB2
Identifying the orifice is only the beginning. The canal must be negotiated safely, and its relationship with the other canals should be assessed.
-
Assess canal negotiability: Advance instruments gently and avoid excessive pressure to reduce the risk of ledge formation, transportation, or other procedural errors.
-
Determine working length: Once a negotiable pathway has been established, determine the working length using appropriate methods, including an electronic apex locator and radiographic confirmation when indicated.
-
Assess canal connections: MB2 may merge with MB1 in the apical portion or follow an independent pathway. Two separate canal orifices do not necessarily mean that two separate apical foramina are present.
-
Clean and shape conservatively: Select cleaning and shaping procedures according to the canal's actual anatomy and dimensions. Avoid unnecessary enlargement that could weaken the root walls.
-
Consider anatomical complexity: Isthmuses, curvatures, and significant calcification may limit mechanical instrumentation and chemical disinfection. These factors should be considered when planning treatment.
9. When Should Further Searching Be Avoided?
In some teeth, severe calcification or complex anatomy may make MB2 difficult or impossible to access safely. Under these circumstances, continued dentin removal without sufficient evidence of the canal's pathway can increase the risk of perforation and structural weakening.
If the orifice remains unidentified despite appropriate access cavity design, careful chamber floor examination, magnification, and controlled exploration, further non-targeted dentin removal should be avoided.
Referral to an endodontist equipped with an operating microscope and appropriate diagnostic facilities may help reduce the risk of complications and support safe treatment planning.
Conclusion
Locating MB2 in maxillary molars requires a combination of anatomical knowledge, appropriate access cavity design, systematic examination of the pulp chamber floor, and correct use of endodontic instruments. Magnification and illumination, an endodontic explorer, fine hand files, and ultrasonic tips can all contribute to canal identification, although none guarantees success on its own.
The central principle is systematic exploration while preserving tooth structure. Conservative dentin removal, selective use of advanced imaging, and recognizing when referral is appropriate are just as important as locating the canal orifice.